In this tutorial, we will learn about Docker container lifecycle. But first, let me share a personal anecdote. On a hot summer afternoon in 2021, my manager called me out of the blue and said, “Muskan, the project file you shared with me is not working on my machine. Could you please come over and fix the setup? It’s really urgent.” I rushed to his cabin and tried my best but could not fix the dependencies issues.

I was super scared and really felt as if I am going to be fired (Nevermind, this was just a feeling :p). But my manager just said, “Now that you know what sort of problems we face during deployment of applications, go and explore the solution aka Docker”.
You might have faced a similar situation, and started exploring Docker after that. It is now a ubiquitous container technology used by many organizations.
We will be learning about Docker container lifecycle in depth. But before diving into Docker container lifecycle, let's have a brief overview of a few concepts of the Docker world.
Why did Docker come into the picture?
There are basically two main use cases where Docker rescues us from getting trapped into dependency and scaling issues.
- Managing application dependencies across dev environments
We have seen the scenario that I faced where the application was working fine on my machine but not on my manager's machine. Possible reasons for my application not working can be:Dependency issues
Versions of third-party libraries not compatible with different machines
But what if we can separate our applications from the underlying infrastructure/hardware being used — enabling rapid development, testing, and deployment? That's where Docker comes into the picture.
- Scaling applications as user demand increases
As the traction on your application increases, adding more resources to the servers becomes a requirement, and you need to manage your resources efficiently. Containers provide a solution for scaling applications efficiently. You can also use VMs, but containers are a better option than VMs.
And by VMs, I mean Virtual Machines. Since containers share the resources of the host OS kernel, far fewer resources are required to run multiple containers, as opposed to VMs. Thus, hardware resource utilization is much more efficient.
What is Docker?
Docker is a platform that allows us to package our applications into deployable executables — called containers, with all its necessary OS libraries and dependencies.
Challenges in using VMs at scale
In layman terms, VMs basically virtualize an entire machine down to the hardware layers. With VMs, we can not efficiently use the hardware resources of a machine as compared to containers. Although VMs do have pros, such as full-isolation security and interactive development, here are the challenges with VMs:
Iteration speed
Virtual machines are time-consuming to build and regenerate because they encompass a full-stack system.Storage size cost
Virtual machines can take up a lot of storage space. They can quickly grow to several gigabytes in size. This can lead to disk space shortage issues on the virtual machines host machine.
Containers vs VMs
Containers are lightweight software packages that contain all the dependencies required to execute the contained software application. These dependencies include things like system libraries, external third-party code packages, and other operating-system-level applications.
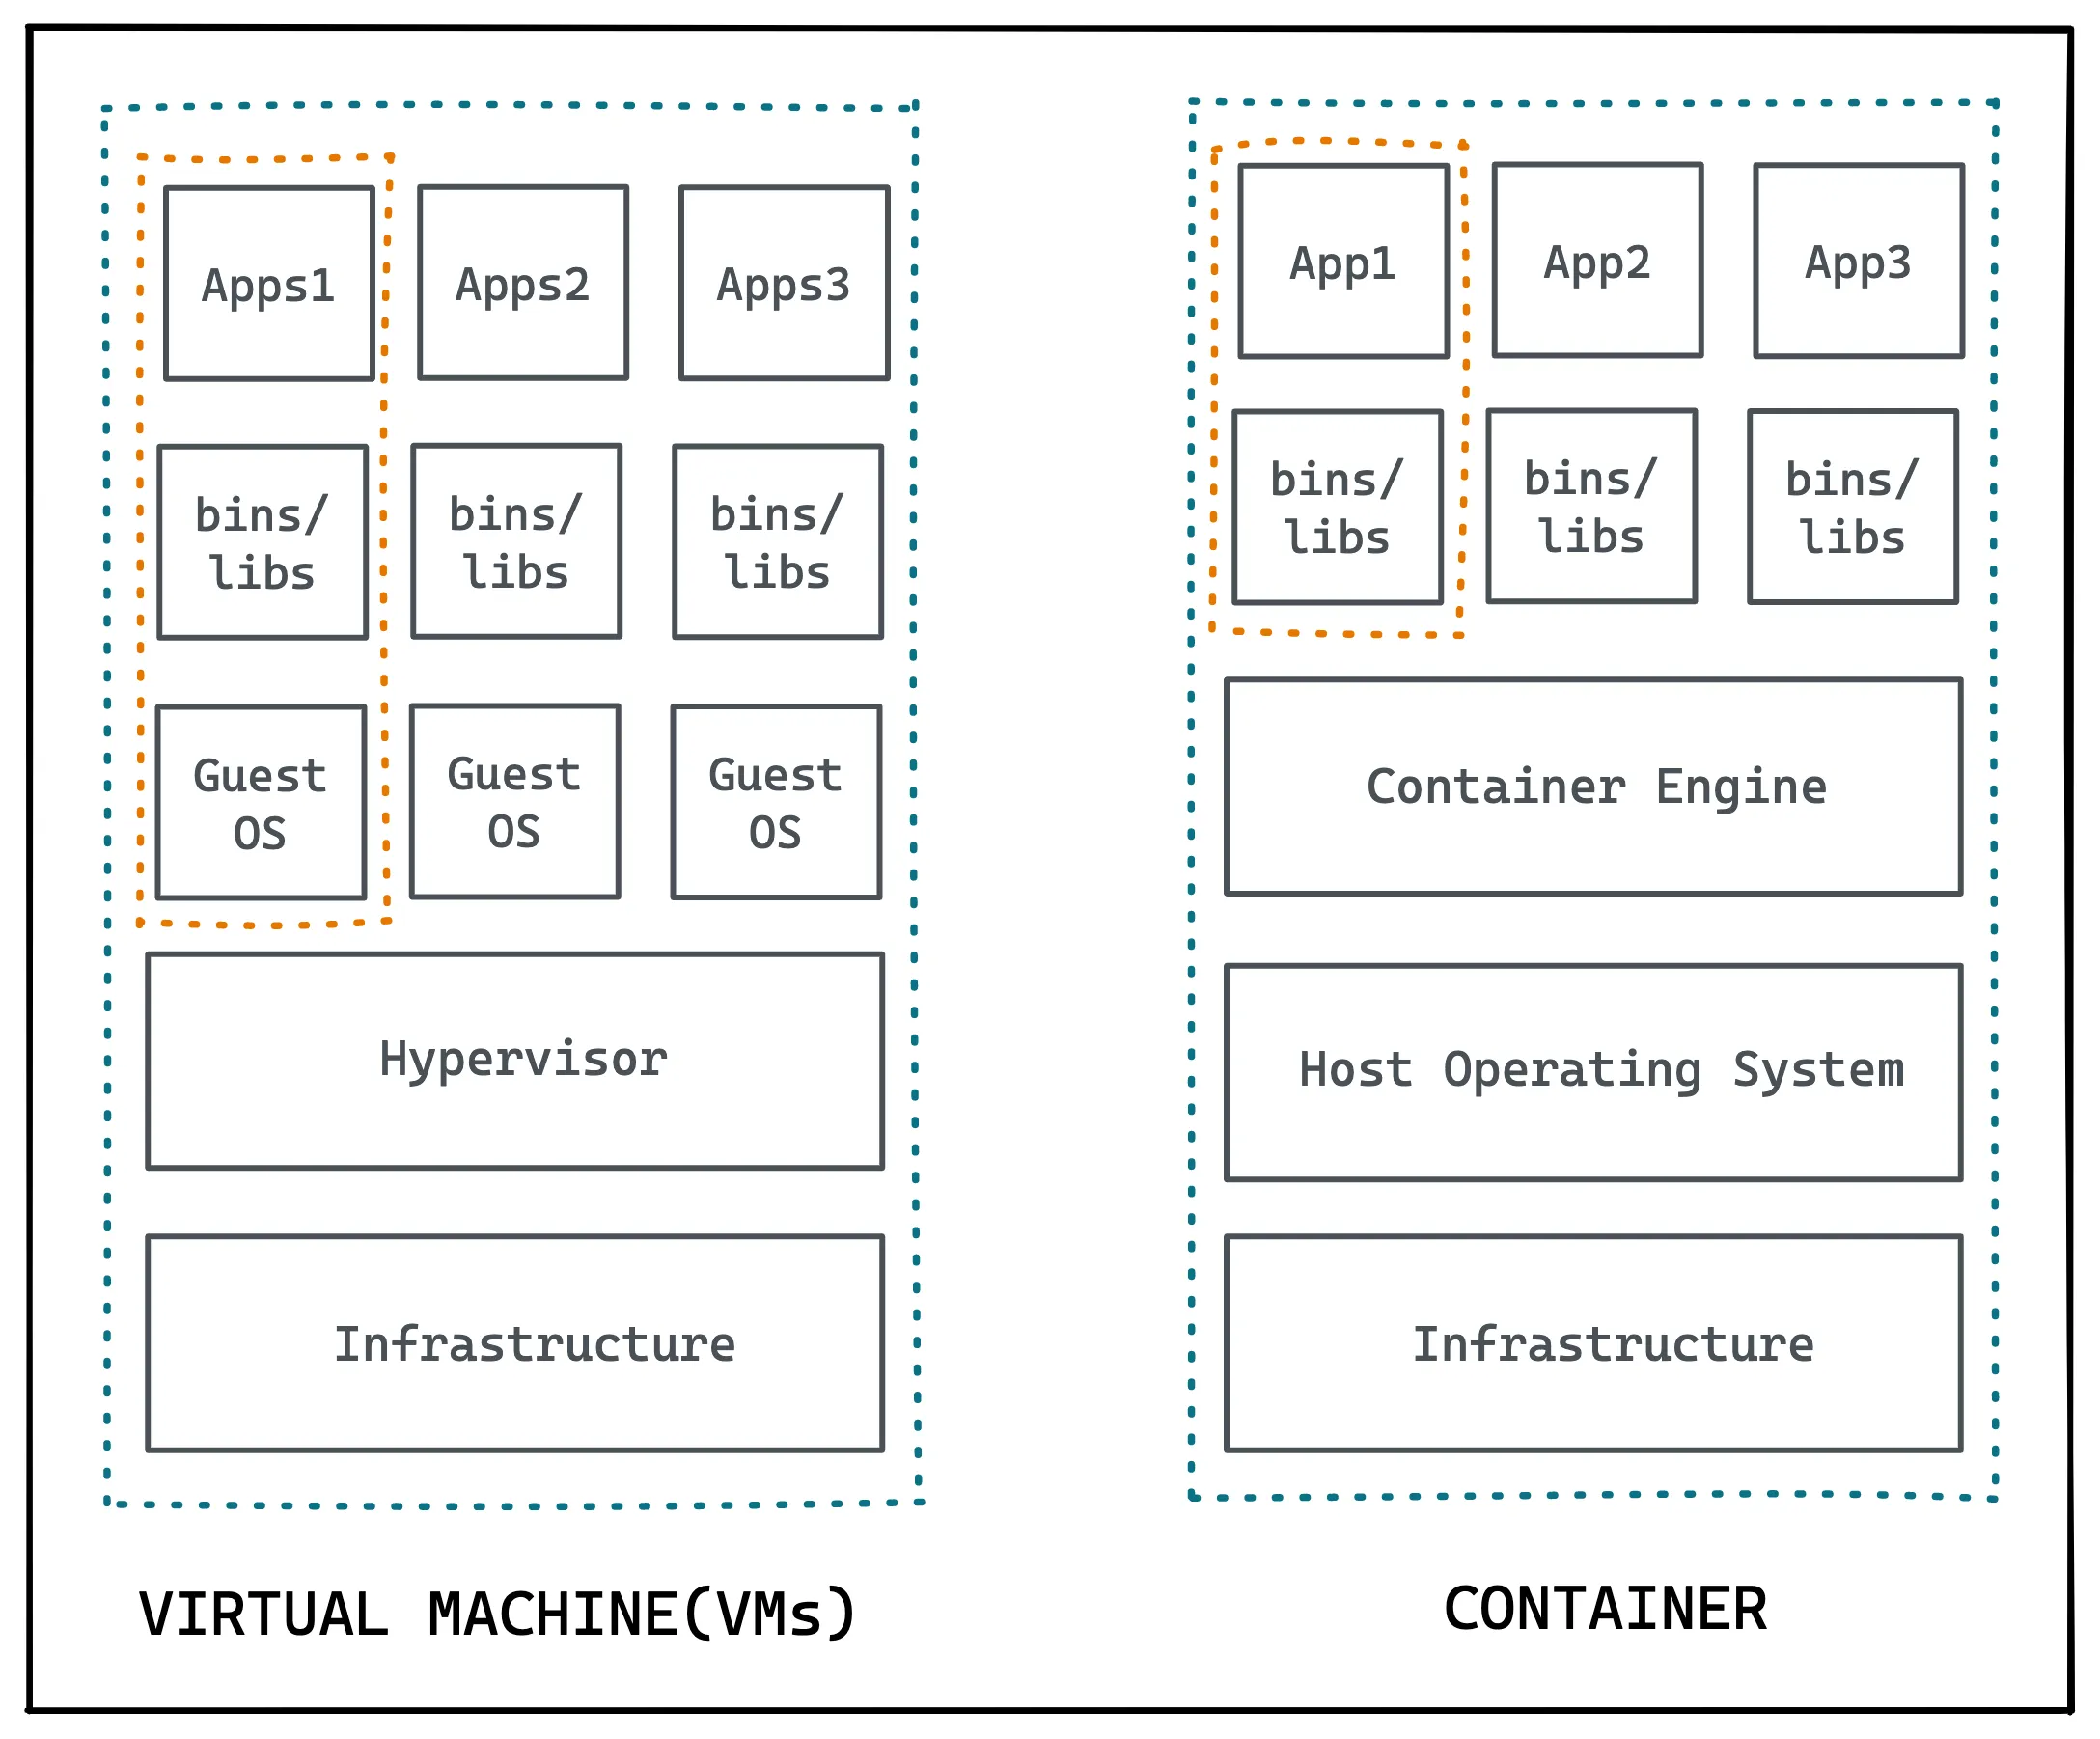
The picture attached below will clarify the difference between Containers and VMs.

While VMs virtualize the hardware layer, containers provide OS-level virtualization.
As you can see in the above image, the dependencies included in a container exist in stack levels that are higher than the operating system. That means containers provide os-level virtualization, whereas VMs provide hardware-level virtualization.
Please note that Docker is not the only platform that provides you with containerization. There are other container providers too, such as RKT, Linux Containers, and CRI-O.
What is Docker Container Lifecycle?
A container is a process in OS. A process is an instance of a computer program that is being executed. But container processes are different. Container processes are fully-functional environments, and they have more isolation from the OS than the processes in OS.
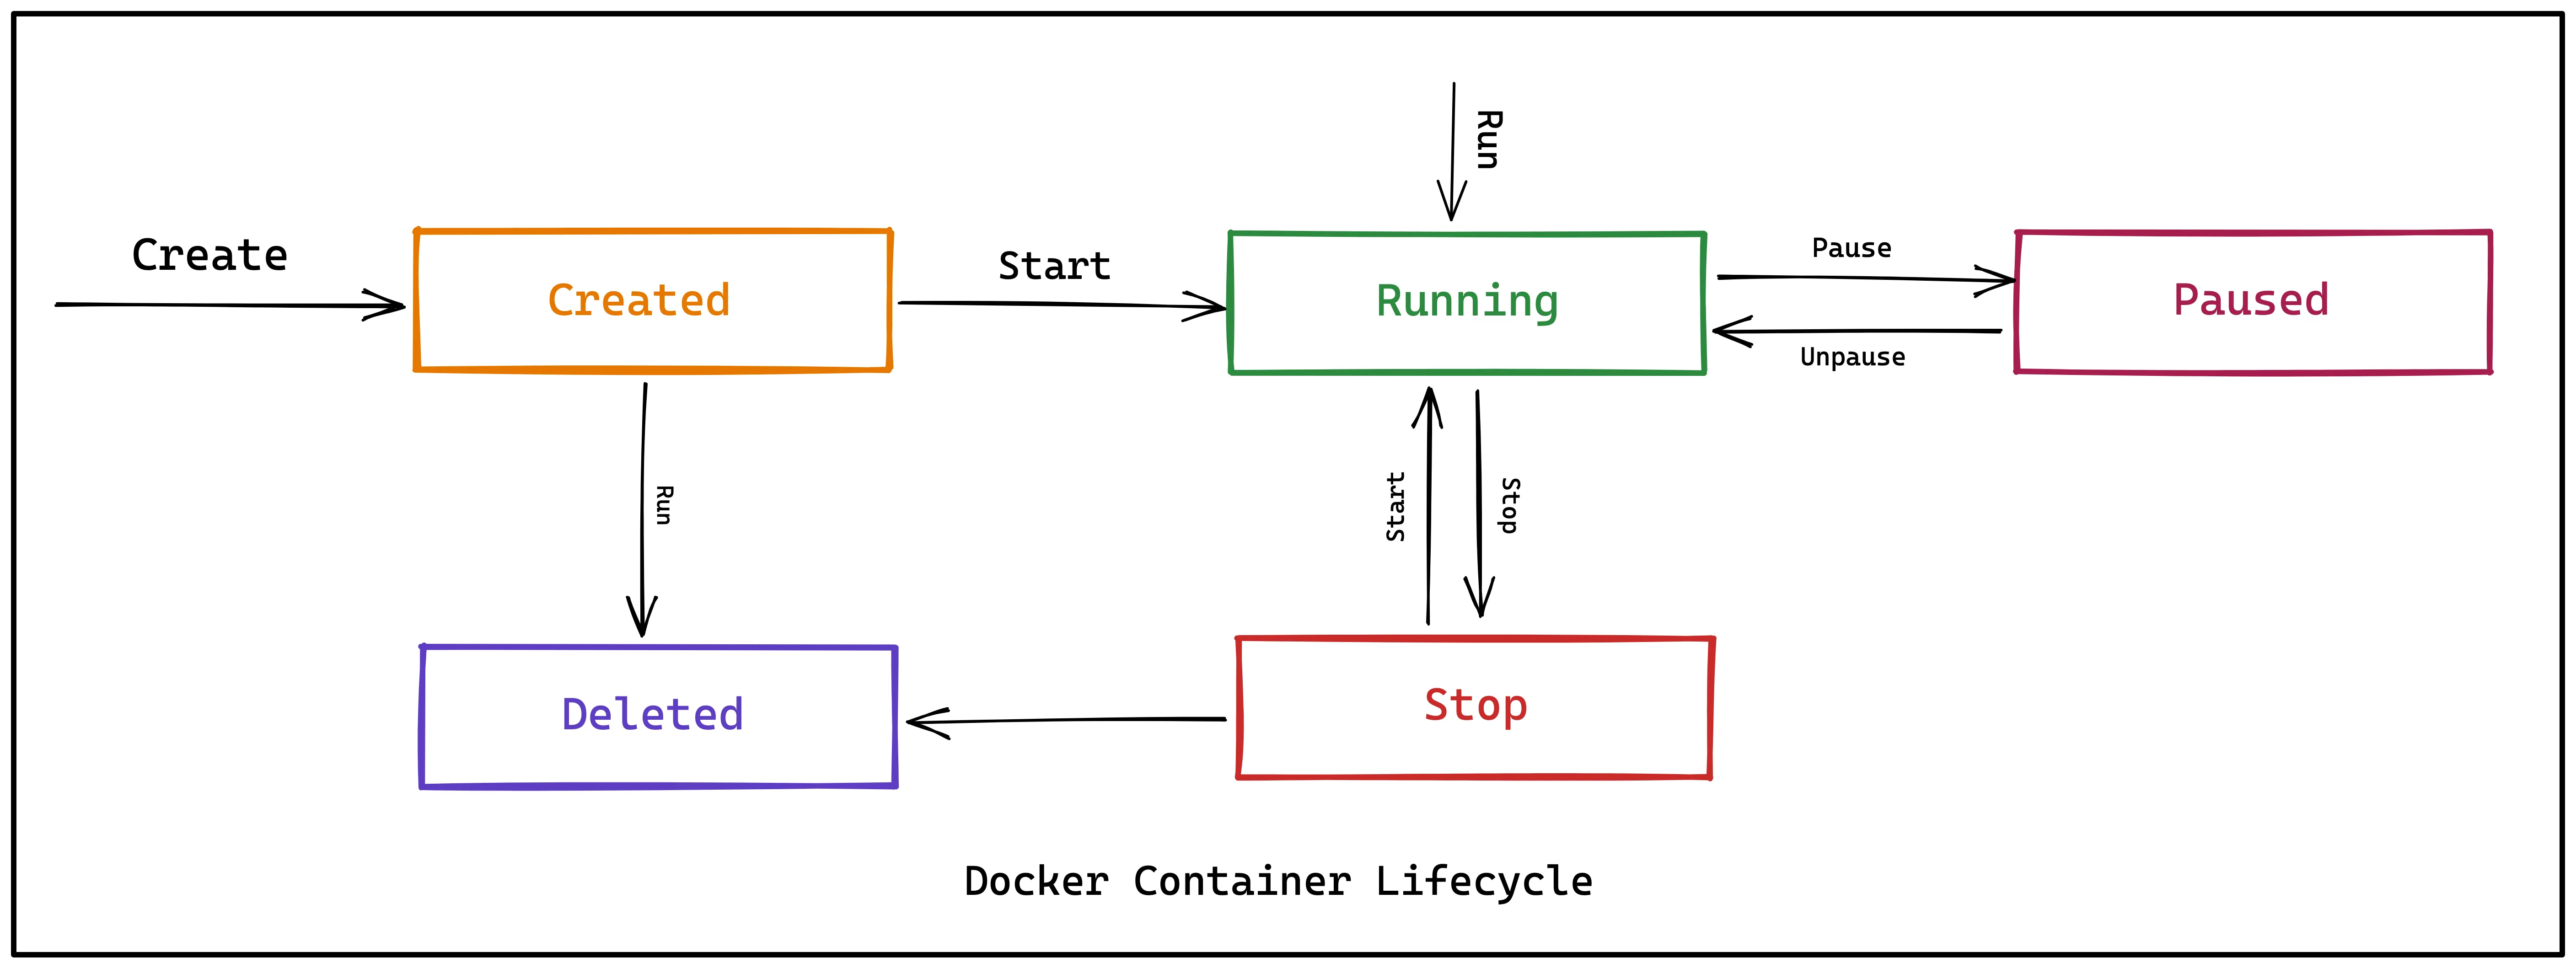
Just like processes, containers have different states throughout their lifecycle. There are mainly five states that a container can be in during its lifecycle -
- Created state
- Running state
- Paused state/ Unpaused state
- Stopped state
- Killed/Deleted state

Created state
The very first state in the lifecycle, after you are done with creating the docker image, is the Created state. In this phase, a docker container is created from a docker image.
Here’s an example of creating a container using the nginx:alpine image and naming it app1:
docker create --name app1 nginx:alpine
The id of the new container is printed if successfully created.
Note that in this state, a container is created only, not started.
Running state
In the running phase, a docker container is running actively. This means the commands listed in the image are being executed one by one by the container.
A container that has been created by the docker create command or stopped can be started using the command written below:
docker start <container-name>
Or if a container is not created and we want to create a container as well as run it at the same time, we can directly use the docker run command:
docker run <container-name>
Or
docker run <container-id>
Paused / Unpaused state
So, as the container is running, there must be a way to pause it. We can do so by running the pause command. This command effectively freezes or suspends all the processes running in a container. When in a paused state, the container is unaware of its state.
docker pause container <container-id or container-name>
It basically sends the SIGSTOP signal to pause the processes in the container.
Similarly, to get the paused container back on running, we’d use the docker unpause command:
docker unpause container <container-id or container-name>
Stopped state
When a container is stopped, its main process stops running immediately. When stopped, the disk portion of the state is persisted, i.e., saved.
The main difference between the paused and stopped states is that the memory portion of the state is cleared when a container is stopped, whereas, in the paused state, its memory portion stays intact.
docker stop <container-id or container-name>
When the above command is executed, the main container process receives a SIGTERM signal (by default), and after a grace period (default 10s as of writing), it receives a SIGKILLsignal.
What are
SIGTERMandSIGKILLsignals?
TheSIGTERMandSIGKILLsignals are POSIX signals which are a standard way of an OS telling a child process how to behave.SIGTERMis sent to a process to request its termination. This allows the process to perform graceful termination, releasing resources and saving state if appropriate.SIGKILLis sent to terminate a process immediately. UnlikeSIGTERM, this signal cannot be caught or ignored, and the receiving process cannot perform any clean-up upon receiving this signal (excluding a few exceptions). If you find it interesting, you can read more about the signals here.
A container also gets stopped if the main process has exited or been completed. Or if it encounters an ‘Out of Memory Exception’.
Killed / Deleted state
For a container to be in a killed state, we run the docker kill command, which sends SIGKILL signals to terminate the main process immediately. This means the difference between docker stop and docker kill is that - stop can allow safe termination (within the grace period) while kill terminates immediately.
The docker kill command:
docker kill <container-id or container-name>
A container that is in the created state or stopped can be removed with docker rm. This will result in the removal of all data associated with the container like the processes, file system, volume & network mappings, etc.
To delete a container, simply run:
docker rm <container-id or container-name>
Note that a container can only be removed if it's not running else it will give you an error asking you to stop the running container first and then delete it.
Conclusion
We have covered all the topics related to Docker in brief and took a deep dive into the lifecycle of containers. Containers are awesome, and you can do really powerful stuff with more advanced tools like Docker Compose, Docker Swarm, Kubernetes, OpenShift, etc.
Once your Docker containers are up and running, you need to take care of the resource usage and performance of containers and their hosts. Docker provides different ways to access these metrics for monitoring, for example, docker stats.
Docker container monitoring is critical for running containerized applications. For a robust monitoring and observability setup, you need to use a tool that visualizes the metrics important for container monitoring and also lets you set alerts on critical metrics. For Docker container monitoring, you can use SigNoz - an open source APM.
SigNoz uses OpenTelemetry to collect metrics from your container for monitoring. OpenTelemetry is becoming the world standard for instrumentation of cloud-native applications, and it is backed by the CNCF foundation, the same foundation under which Kubernetes graduated.
You can check out the SigNoz GitHub repo here:
To know more about Signoz, read the following blog:
SigNoz - an open-source alternative to DataDog
If you’re running your application using Kubernetes, read the following blog:

